Basic
Syntax
- CSS 规则由两个主要的部分构成:选择器 (Selector),以及一条或多条声明 (declaration)。
- 选择器通常是您需要改变样式的 HTML 元素。
- 每条声明由一个属性 (property) 和一个值 (value) 组成。
- 每个属性有一个值。属性和值被冒号分开。
- 属性大于 1 个之后,属性之间用分号隔开。
- 如果值大于 1 个单词,则需要加引号.
格式:
selector {
    declaration1;
    declaration2;
    ...
    declarationN;
}
例子:
h1{
   color:red;
   font-size:14px;
   font-family:"sans serif";
}
Advanced Syntax
- 选择器的分组
- 被分组的选择器就可以分享相同的声明。
- 用逗号将需要分组的选择器分开。
h1,h2,h3,h4,h5,h6{color:red;}
- 继承
- 子元素从父元素继承属性。
- 子元素 (诸如 p, td, ul, ol, ul, li, dl, …) 将继承最高级元素(body)所拥有的属性。
- 子元素的子元素也一样。
基础选择器
派生选择器
派生选择器允许你根据文档的上下文关系来确定某个标签的样式
例子:让所有列表中的 strong 元素变为红色,而不是通常的黑色
li strong{
    color: red;
}
id 选择器
- id 选择器
- id 选择器可以: 给标有 id 的 HTML 元素指定特定的样式
- id 选择器以 “#” 来定义
- id 选择器和派生选择器
- id 选择器常常用于建立派生选择器
例子:
#divid {color: red;}
#pid a{color: #00755f;}
<!doctype html>
<html>
    <head>
        <meta charset="UTF-8">
        <title></title>
        <link href="selector.css" type="text/css" rel="stylesheet">
    </head>
    <body>
        <div id="divid">this is a div</div>
        <p id="pid">hello css</br>
            <a href="http://www.shiyanlou.com">shiyanlou</a>
        </p>
    </body>
</html>
类选择器
例子:
.divclass {color: red}
<div class="divclass"> hello world </div>
例子:类选择器与派生选择器嵌套
.pclass a {color: red}
<p class="pclass">这是一个 class 显示效果
    <a href="hhtp://www.example.com">效果</a>
</p>
属性选择器
例子:为所有有 title 属性设置样式
[title]
{
color:red;
}
例子:为所有有 title=”te” 的元素设置样式
[title=te]
{
color:red;
}
id 和 class 的区别
详细解说看这个文章
在实现原理上,id 和 class 是相同的。但是通常,一个网页中不能出现多个元素有相同 id 的情况:id 被用来区分特定的元素。
- Each element can have only one ID
- Each page can have only one element with that ID
- You can use the same class on multiple elements.
- You can use multiple classes on the same element.
Yes, the id and class attributes do work in the same way and the web browser treats them the same. However, the implied rule is that no two elements on a page should have the same id, but many elements on one page can have the same class. Although the browser won’t render the web page unusually if you use the same id twice, developers see it as more semantically correct to use unique identities. This is because doing this makes reading the source code is a bit easier; if you see an element with an id, you know it is likely to be something that stands out from the rest of the page, because it should be the only element with that particular styling.
CSS 基础样式
背景
设定背景颜色
body{
   background-color: red;
}

p{
    background-color: #0014ff;
}
将图片设置为背景
body{
   background-image: url("pic.png");
   background-repeat: no-repeat;
   /*no-repeat 不能重复
           repeat 可重复
        repeat-x 表示 x 轴重复
        repeat-y 表示 y 轴重复*/
   background-position:center top;
   background-attachment:fixed;
   /*背景关联 如果网页比较长,那么当网页向下滚动时,背景图像也会随之滚动。*/
   background-size: 100px 100px
}
文本
- 属性 - 描述
- color - 文本颜色
- direction - 文本方向
- line-height - 行高
- letter-spacing - 字符间距
- text-align - 对齐元素中的文本
- text-decoration - 向文本添加修饰
- text-indent - 缩进元素中文本的首行
- text-transform - 元素中的字母
- unicode-bidi - 设置文本方向
- white-space - 元素中空白的处理方式
- word-spacing - 字间距
链接
链接的四种状态:
- a:link – 普通的、未被访问的链接
- a:visited – 用户已访问的链接
- a:hover – 鼠标指针位于链接的上方
- a:active – 链接被点击的时刻
例子:
a:link {background-color: azure; color:blue;}
a:visited {background-color: azure; color:purple;}
a:hover {background-color: azure color:navy;}
a:active {background-color: azure; color:crimson;}
列表
ol {list-style: lower-greek}
 /*改变所有 ordered list 的图标*/
ul.lower-alpha {list-style: lower-alpha}
ul.list_image {list-style-image: url("list_image.png");}
/*使用图片代替列表图标*/
<!doctype: html>
<html>
    <head>
        <meta charset="utf-8">
        <title>css list intro</title>
        <link rel="stylesheet" href="list.css" type="text/css">
    </head>
    <body>
        <ol>
            <li>hello world</li>
            <li>hello sam</li>
            <li>hello jack</li>
        </ol>
        <ul class="lower-alpha">
            <li>hello world</li>
            <li>hello sam</li>
            <li>hello jack</li>
        </ul>
        <ul class="list_image">
            <li>hello image</li>
            <li>hello picture</li>
            <li>hello beauty</li>
        </ul>
    </body>
</html>
表格
/*设置 table 的 th 和 td*/
/*这里 table 是 id 选择器*/
#table th, td{
    border: 2px solid lightblue;
    border-collapse: collapse;
    width: 100px;
    text-align: center;
}

/*单独设置 th 有不同的背景色和文字颜色*/
#table th{
    background-color:aliceblue;
    color:black;
}
/*单独设置 tr2 的 td 有不同的背景色和文字颜色*/
/*这里 .tr2 是类选择器*/
#table tr.tr2 td{
    background-color:white;
    color:indianred;
}
<!doctype: html>
<html>
    <head>
        <meta charset="utf-8">
        <title>css table intro</title>
        <link rel="stylesheet" type="text/css" href="table.css">
    </head>
    <body>
        <table id="table">
            <tr>
                <th>time</th>
                <th>user</th>
                <th>tel</th>
            </tr>

            <tr class="tr2">
                <td>today</td>
                <td>jaggie</td>
                <td>5423</td>
            </tr>

            <tr class="tr2">
                <td>tomorrow</td>
                <td>lynda</td>
                <td>2396</td>
            </tr>

        </table>
    </body>
</html>
轮廓
例子:
#p1{
    outline-color: red;
    outline-style: groove;
    outline-width: 2px;
}

#p2{
    outline-color: blue;
    outline-style: dotted;
    outline-width: 2px;
}
<html>
    <head>
        <meta charset="utf-8">
        <title> css intro outlie</title>
        <link rel="stylesheet", type="text/css", href="outline.css">
    </head>
    <body>
        <p id="p1">hello world!</p>
        <p id="p2">hello world!</p>
    </body>
</html>
CSS 盒子模型
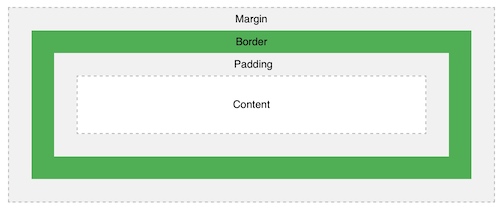
模型示意图
例子:
.top{
    background-color: aliceblue;
    width:100%;
    height:70px;
    text-align: left;
}

.top_center{
    margin:0px auto;
    width:75%;
    height: 70px;
    background-color: cadetblue;
    text-align: center;
    color: aliceblue;
}

.middle{
    margin: 0px auto;
    width: 75%;
    height: 700px;
    background-color: cornsilk;
}

.middle_1{
    margin: 0px;
    width:100%;
    height: 10%;
    background-color: darksalmon;
    text-align: center;
}

.middle_2{
    margin: 10px, 0px;
    width:100%;
    height: 10%;
    background-color: darkorange;
    text-align: center;
}
<html>
<head>
    <link rel="stylesheet" type="text/css" href="Box_3.css">
    </head>

<body>
    <div class="top">
        <div class="top_center">
            Top center
        </div>
    </div>
    <div class="middle">
        <div class="middle_1">Middle 1</div>
        </br>
        <div class="middle_2">Middle 2</div>
    </div>
    </body>
</html>
CSS 高级
定位
定位:允许你定义元素框相对于其正常位置应该出现的位置,或者相对于父元素、另一个元素甚至浏览器窗口本身的位置。
- 定位机制 (relative)
- 普通流 :元素按照其在 HTML 中的位置顺序决定排布的过程
- 浮动 (float):浮动的框可以向左或向右移动,直到它的外边缘碰到包含框或另一个浮动框的边框为止。
- 绝对定位 (absolute):绝对定位使元素的位置与文档流无关,因此不占据空间。这一点与相对定位不同,相对定位实际上被看作普通流定位模型的一部分,因为元素的位置相对于它在普通流中的位置。
- 定位属性
- position 将元素放在
- 静态的位置
- relative 相对的位置
- absolute 绝对的位置
- 固定的位置
- top,left,right,bottom 元素向对应的方向偏移
- overflow 设置元素溢出其区域发生的事情
- clip 设置元素的显示形状,多用于图片
- vertical-align 设置元素的垂直对其方式
- z-index 设置元素的堆叠顺序 (序数大的在上面)
- position 将元素放在
浮动
尺寸
属性:
- width 设置元素的宽度
- height 设置元素的高度
- line-height 设置行高
- max-height 设置元素的最大高
- max-width 设置元素的最大宽度
- min-height 设置元素的最小高度
- min-width 设置元素的最小宽度